Where Should a Soundbar Go in a Media Wall?
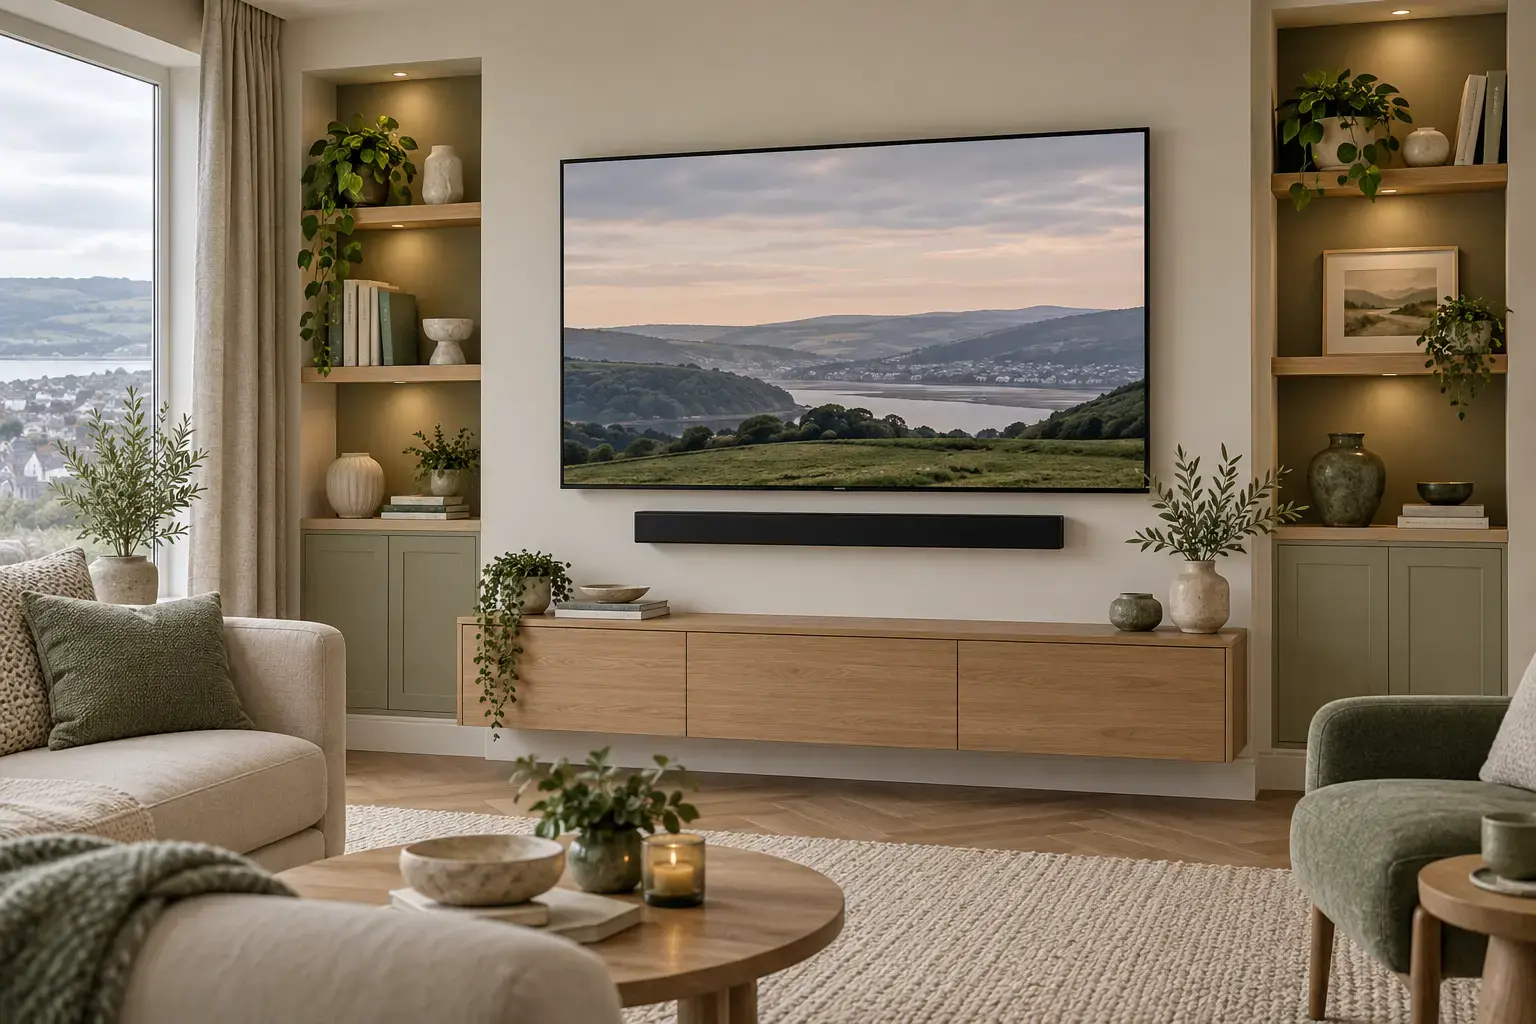
For most media walls, the safest starting point is to put the soundbar below the TV, facing the seating area, with its top and ends open. Mount it on the wall face or place it at the front of an open shelf. Do not design a tight recess until you have checked the exact soundbar's instructions, because top-firing and side-firing speakers can be blocked by the surround.
The important choice is not simply “above or below the TV”. It is whether the finished wall lets the selected soundbar project sound as its manufacturer intended, while keeping power and signal cables replaceable. Choose the model before the opening is built—not after the plaster has dried.
The image above is an AI-generated editorial concept, not a photograph of a completed customer installation or an acoustic specification.
Three ways to include a soundbar
| Layout | Why it can work | Main trade-off | Best question to ask |
|---|---|---|---|
| Wall-mounted below the TV | Leaves the bar exposed and can keep it close to the screen | Bracket, fixings and cable exits remain visible design details | Does the manufacturer approve wall mounting, and what clearance does this model need? |
| On an open shelf or cabinet | Easy to remove, replace and reach the connections | The shelf must not sit in front of the speaker or trap it behind a lip | Can the front of the bar sit at the shelf edge with open space around its drivers? |
| In a recess | Creates a very integrated appearance | A top, sides or deep setback can obstruct directional drivers and make replacement harder | Does the exact model permit enclosure, and can every firing surface remain unobstructed? |
A face-mounted soundbar is not automatically perfect, and a recess is not automatically wrong. The product design decides. A compact bar with only forward-facing drivers creates a different brief from a Dolby Atmos model with speakers aimed upwards and sideways.
Why a tight recess can change the sound
Some Dolby Atmos soundbars create height effects with upward-firing speaker elements. Dolby explains that these speakers use the ceiling reflection to direct sound towards the listening position. A shelf or recess immediately above the bar interrupts that intended path. Dolby's speaker setup guidance is a useful explanation of the principle.
Manufacturers then set instructions for individual models. For example, the Sonos Arc Ultra guide says not to enclose that product in a cabinet or corner, recommends positioning it in front of and below the TV, and specifies model-specific clearances. Bose similarly advises against putting an upward-firing soundbar in a recessed shelf and recommends placing it at the edge of a surface or mounting it on the wall in its soundbar placement guidance.
Those examples are not universal dimensions for every soundbar. They demonstrate why a media-wall drawing must follow the chosen model's current manual rather than copying a gap from another installation.
Check all the surfaces that emit sound:
- Front: keep the grille aimed into the room rather than behind a shelf lip or decorative panel.
- Top: leave any upward-firing drivers and controls unobstructed as the instructions require.
- Ends: side-firing drivers may need clear space instead of returning immediately into a narrow niche.
- Rear: allow for the specified wall mount, plugs and cable bend without forcing connections against the wall.
Choose the soundbar before setting the TV height
Soundbar position, TV height and any electric fire are one layout decision. If each item is planned separately, the completed stack can push the screen higher than intended.
Start with the TV centre at a comfortable level using our media wall TV height guide. Add the actual soundbar height, its manufacturer-required spacing and the mounting detail below it. If the soundbar and a fire no longer fit without lifting the TV beyond the tested position, revise the arrangement rather than squeezing every gap.
Possible changes include:
- Leaving the soundbar on the face instead of inside a deep niche.
- Moving storage or the fire elsewhere in the composition.
- Choosing a different soundbar whose approved mounting method suits the room.
- Omitting the fire where comfortable viewing and usable audio matter more.
For a wall that includes heat, select the exact products and check both sets of instructions. Our electric fire media wall guide covers that appliance decision. A generic “media wall fire” label does not replace model-specific clearances and ventilation requirements.
Plan the connections, not just the opening
A soundbar normally needs mains power and an audio connection. The correct audio route depends on the TV and soundbar. As one example, Sonos says its current Arc, Arc Ultra and Beam models use an HDMI ARC connection for their main TV features, with model-dependent optical options; it also explains that supported Dolby Atmos playback requires HDMI ARC or eARC in its TV compatibility guidance.
Before the wall is closed, record:
- which TV port the soundbar must use;
- the cable route between the TV and soundbar;
- where the soundbar's plug and any network connection will sit;
- whether plugs can be reached without removing fixed panels;
- how a failed or obsolete cable can be pulled out and replaced;
- where any separate subwoofer and rear speakers will go.
Do not rely on a cable being “wireless” because the marketing name says so. The bar still needs power, and the main TV link may be wired. Likewise, do not bury a permanently captive cable just to make the front elevation look cleaner.
Ask for a usable route—such as appropriately planned conduit or accessible voids—rather than loose leads trapped behind finished board. The route must suit the actual plugs as well as the cable diameter; a narrow path that accepts bare cable but not its connector is not useful.
A worked model-first planning example
Suppose a homeowner likes a deep soundbar recess shown in an inspiration photo but has not bought the soundbar. The first sketch leaves a slot directly below the TV with a low top and closed ends.
They then shortlist a model with upward- and side-firing speakers. Its instructions require open space the sketch does not provide. Instead of enlarging the slot by guesswork, the brief changes to a wall-mounted bar below the TV, with its approved bracket and model-specific spacing shown on the elevation. The cable route terminates behind an accessible area, and the cabinet below remains separate.
The visual result is slightly less “hidden”, but the design now preserves the soundbar's intended radiation paths, keeps the screen at the tested height and makes the speaker replaceable. No assumed acoustic clearance was used: the approved drawing records the selected model's current requirements.
This is the useful order:
- Choose or shortlist the soundbar.
- Download its current installation instructions.
- Mark every driver, control and connection location.
- Test the TV and soundbar outlines together from the sofa.
- Design the wall, fire and storage around those constraints.
Avoid building a slot for one product forever
A close-fitting recess can make a future soundbar difficult to buy. Replacement models vary in width, height, depth, connector position, mounting method and speaker direction—even when they look similar online.
For better flexibility:
- favour an open face or shelf where a slightly different bar can still fit;
- keep the bracket fixing area strong and accessible;
- leave a cable route that accepts replacement HDMI and power leads;
- record the largest usable equipment envelope on the drawing;
- check that the bar can be removed without taking off fixed trim or damaging the finish.
Future-proofing does not mean making a large anonymous hole. It means preserving access and avoiding a decorative feature that defeats the next product's instructions.
Your soundbar planning card
Complete this before approving the media wall. “To be decided later” is a warning that the opening should not be fixed yet.
| Detail | What to record |
|---|---|
| Exact model | Manufacturer and full model number |
| Overall size | Width × height × depth from the current specification |
| Driver directions | Front, top and side locations |
| Approved position | Surface, wall mount, above/below TV and any prohibited enclosure |
| Clearances | Values copied from that model's instructions |
| Mounting hardware | Manufacturer bracket or approved alternative and fixing needs |
| TV connection | HDMI ARC/eARC, optical or another supported route |
| Power and data | Plug position, access and any Ethernet requirement |
| Service route | How the bar and every lead can be removed or replaced |
| Upgrade allowance | Realistic larger replacement envelope—not a promise that all models fit |
| Room layout | Main seating position, subwoofer and any rear-speaker locations |
Send the completed card with the TV and fire model numbers. It gives the designer information that a mood-board image cannot show.
Before you sign off the drawing
Use this final check:
- The soundbar model and its latest instructions have been confirmed.
- The front, top and ends are as open as that model requires.
- The TV remains at a height you have tested from your normal seat.
- Power and signal connections are reachable.
- Cables can be replaced after the wall is finished.
- The soundbar can be removed without damaging fixed finishes.
- Any fire layout is permitted by both appliance instructions.
- The subwoofer, rear speakers and router have practical locations.
- The quote or drawing identifies who provides the brackets, cables and electrical work.
Smart Space Living designs and installs bespoke media walls across South Wales. Request a free design consultation and quote with your TV, soundbar and fire model numbers—or your shortlist—and we can plan the wall around equipment you can actually use, access and replace.